
Popup forms can be essential marketing tools, enabling you to capture email addresses, promote sales, and more. However, making attractive and customized popups in WordPress isn’t always straightforward.
Fortunately, the Elementor page builder plugin makes it easy to create and customize popups on your website. You can tweak them to match your site’s design and add triggers based on user behavior or origins.
This guide will give an overview of the different kinds of Elementor popups and why you might want to use them. Then, we’ll explain how to make these popups with both the free and Pro Elementor tools. Let’s get started!
An Overview of Elementor Popups
Elementor is one of the most popular page builder plugins for WordPress websites. It enables you to drag and drop elements into place to design beautiful and user-friendly pages:

Furthermore, Elementor enables you to create a variety of popups. These are custom forms that appear on your site after a predetermined time, or after a user completes a particular action.
Popups can be essential tools for various reasons. You can use them to collect leads and expand your email marketing list. Elementor popups integrate with email marketing software, sending customer addresses directly to your platform of choice.
You might even utilize them to promote sales, discounts, and events related to your ecommerce store. As such, popups can be integral to your overall marketing strategy.
Moreover, popups can help you connect with your customers. You can embed surveys to ask for consumer feedback and improve your products and services.
However, popups can feel cheap and intrusive if you don’t design them well and choose the correct triggers for your audience. Therefore, you’ll need to make sure that you use them effectively. This is where Elementor comes in.
Types of Elementor Popups
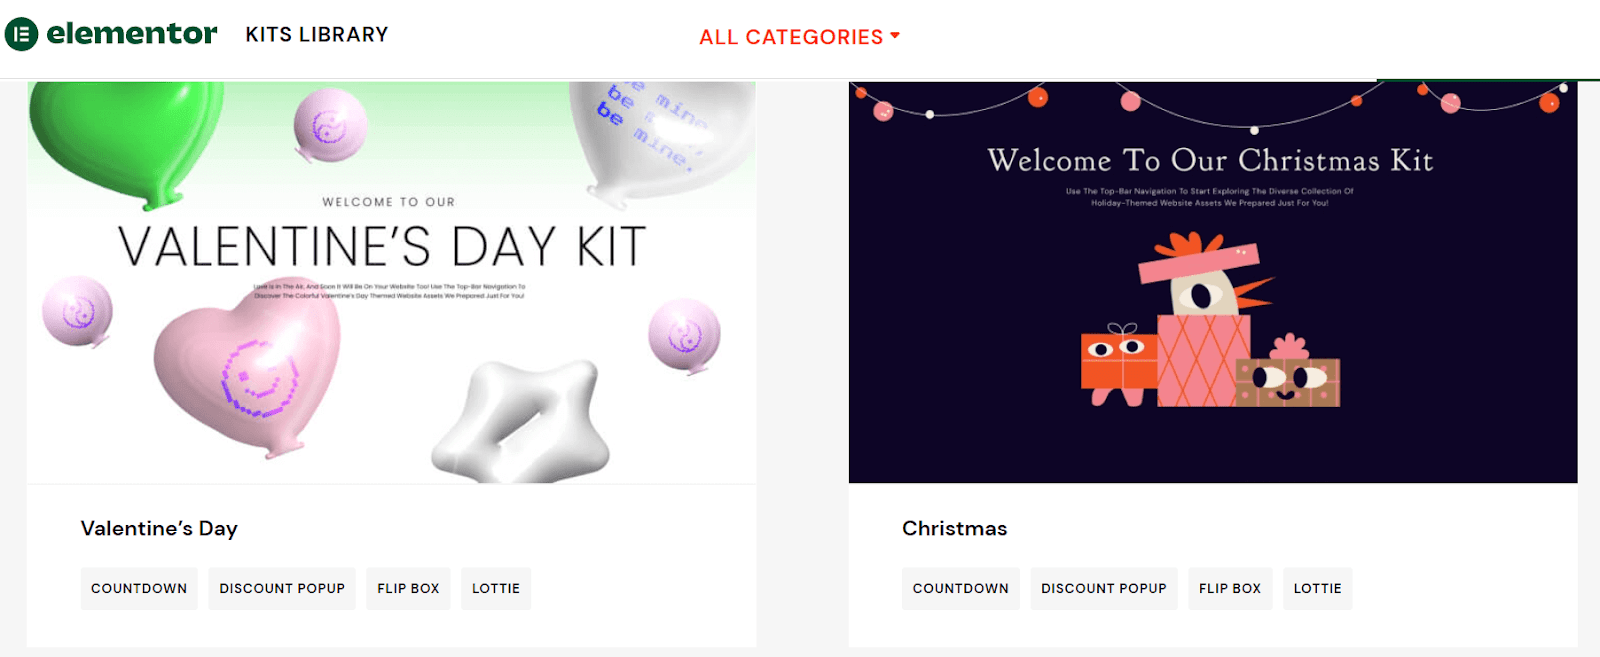
Elementor comes with more than 100 popup templates that you can customize to your needs. These designs include:
- Lead capture forms
- Email signup popups
- Promotional popups
- Login and welcome forms
- Restricted content popups
- Upsell and cross-sell forms
These popup templates come built into Elementor kits, which include various design features for different kinds of websites:
Furthermore, you can choose from different popup placements and visual designs, including:
- Modal
- Slide-in
- Fullscreen
- Top or bottom bar
Finally, you can use the Elementor editor to quickly customize any popup template to fit your needs. We’ll now explain how you can do that with free and Elementor Pro.
How To Create a Popup With Elementor (Free)
Previously, the Essential Addons for Elementor plugin had a Modal Popup feature that enables users to create a free popup form. Using it was one of the most popular ways to get around paying for Elementor Pro. You can find many tutorial videos from a few years ago to show you how to use this method.
However, the free Modal Popup feature has transformed into a premium Lightbox and Modal element. It is no longer free to use. Therefore, you’ll need to upgrade to Elementor Pro or pay for one of the premium Elementor plugins that we cover later in this post.
How To Create a Popup With Elementor Pro (in 5 Easy Steps)
Elementor Pro comes with an in-built Popups feature that we will use in this tutorial. You’ll first need to purchase and activate Elementor Pro. Then, you can head to your WordPress dashboard to get started with making popups.
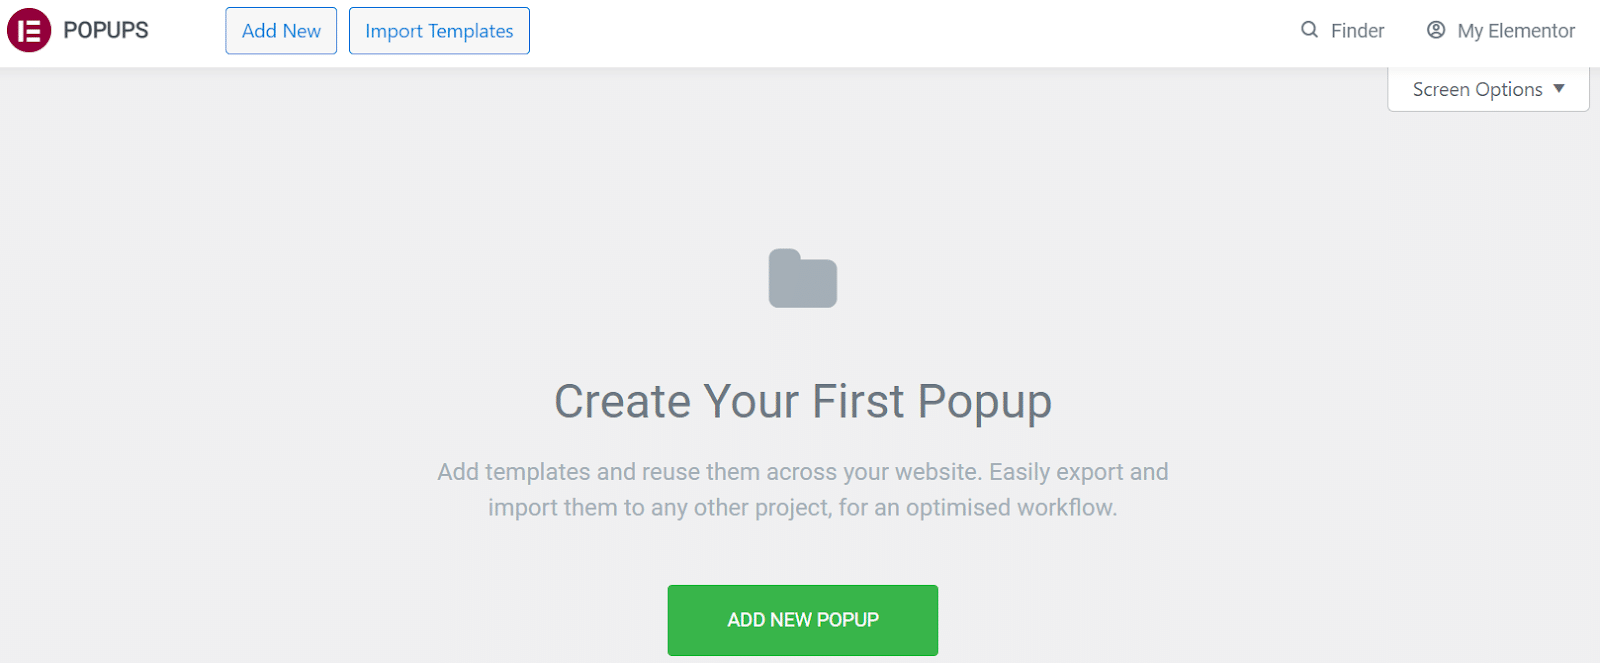
Step 1: Make Your Popup
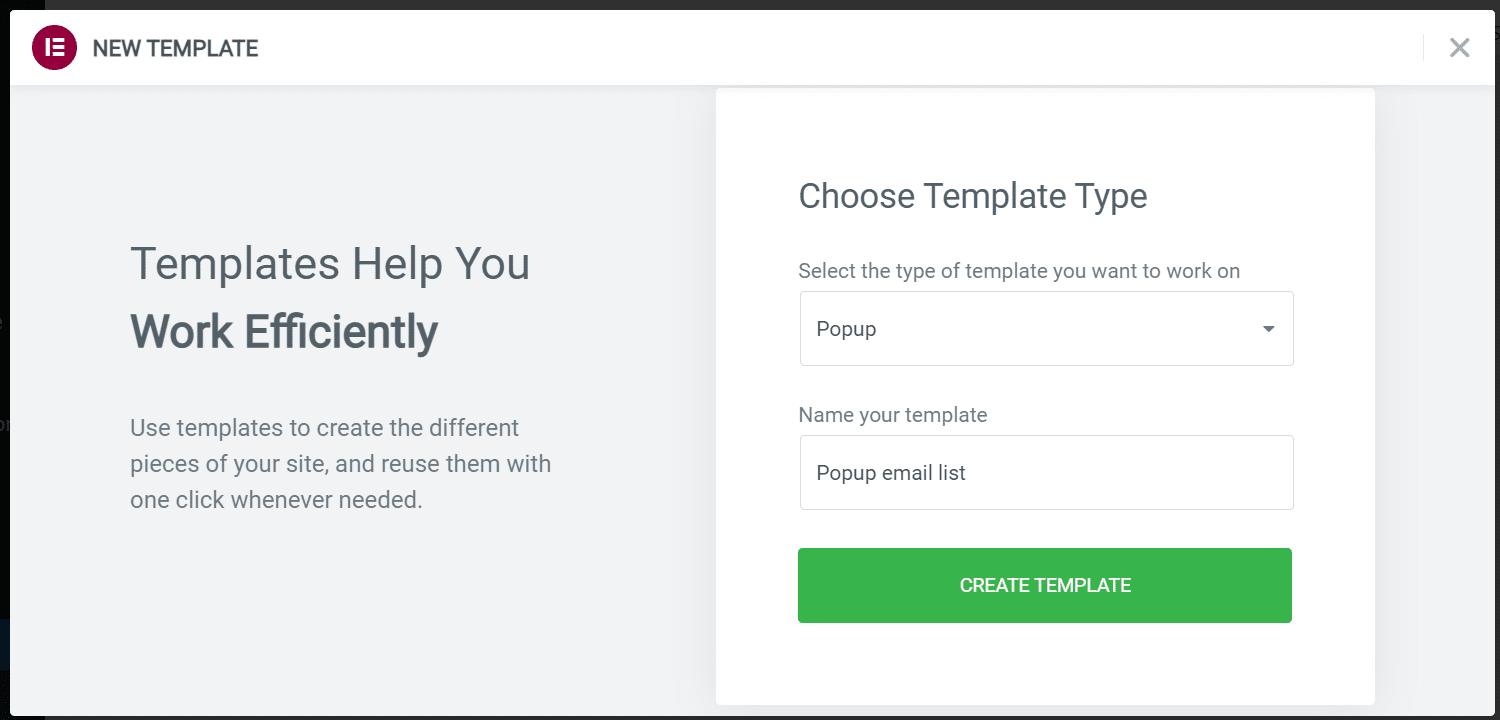
Start by navigating to Elementor > Templates > Popups in your WordPress dashboard. Then, click on ADD NEW POPUPto create a new one:
You’ll then be prompted to name your template. Once you’ve decided on a name, select CREATE TEMPLATE:
This will launch the Elementor page builder. You can now choose from the existing popup template designs or build your own from scratch. In our example, we’ve chosen one of the existing templates to edit:
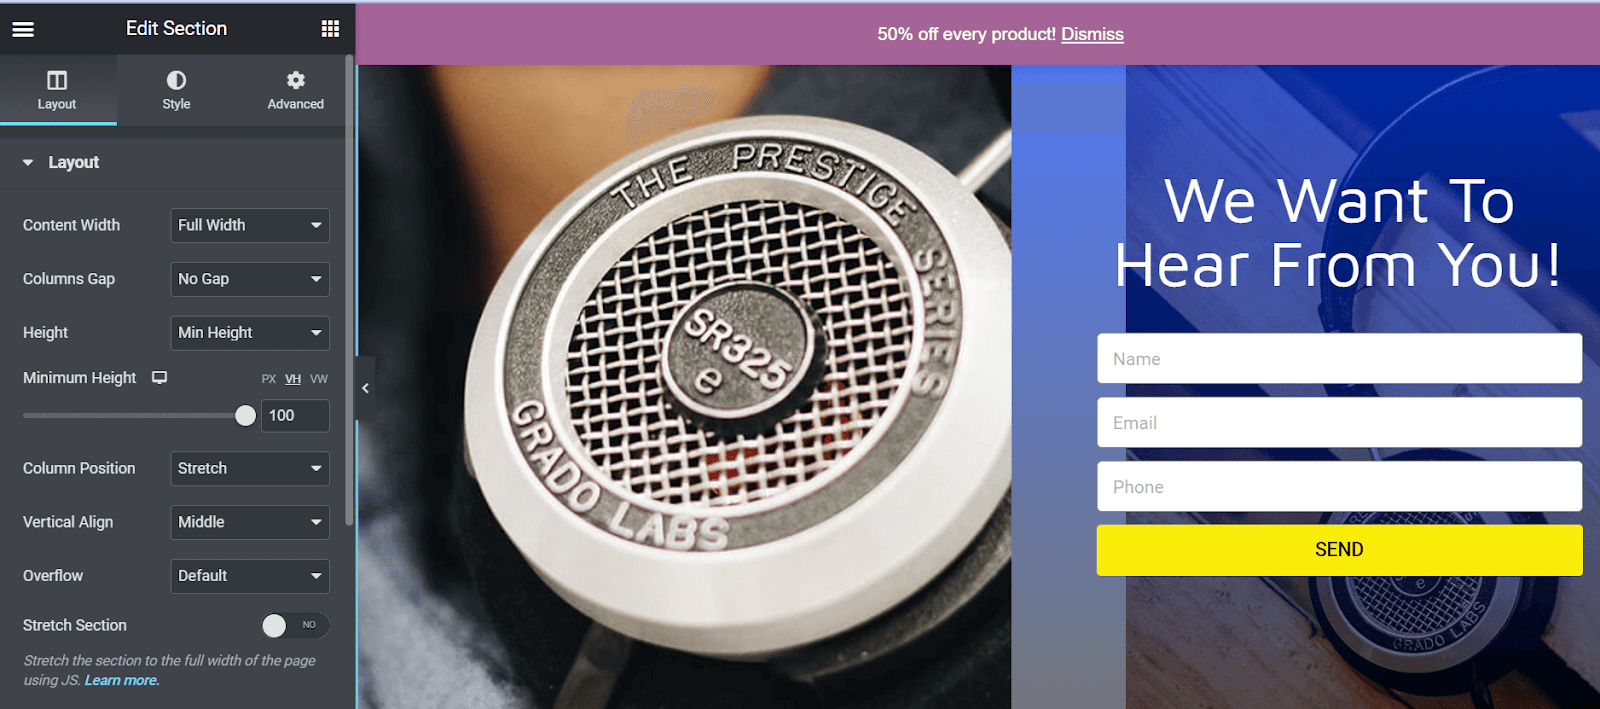
You can now play around with the design settings to customize your popup. For example, you can change its layout, alignment, background images, and colors.
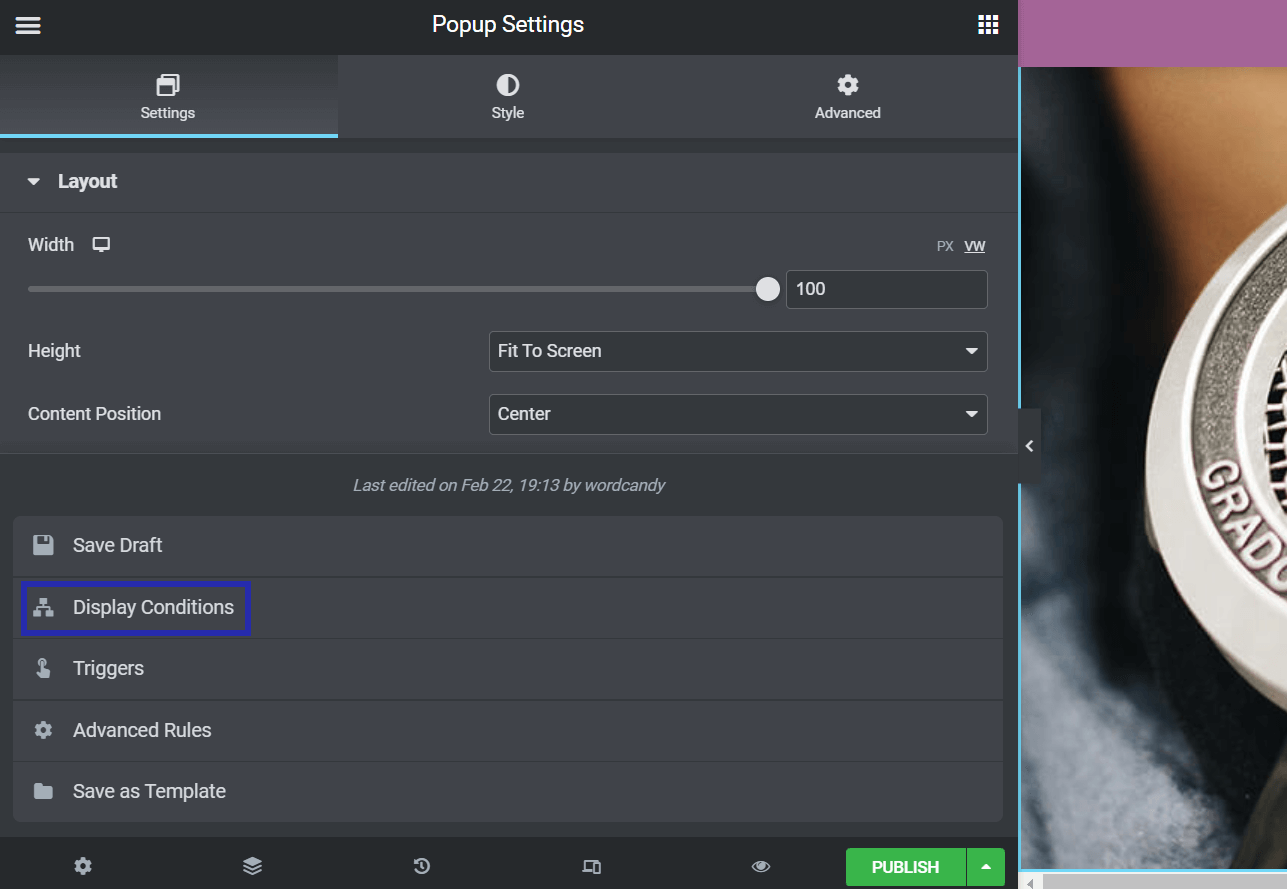
Step 2: Choose Your Display Conditions
Once you’re happy with your design, click on the upward-facing arrow next to PUBLISH. Then, select Display Conditions from the menu that appears:
Next, hit ADD CONDITION to choose where your Elementor popup will display on your website. You can then select a location from the following options: Entire Site, Archives, Singular, or WooCommerce:
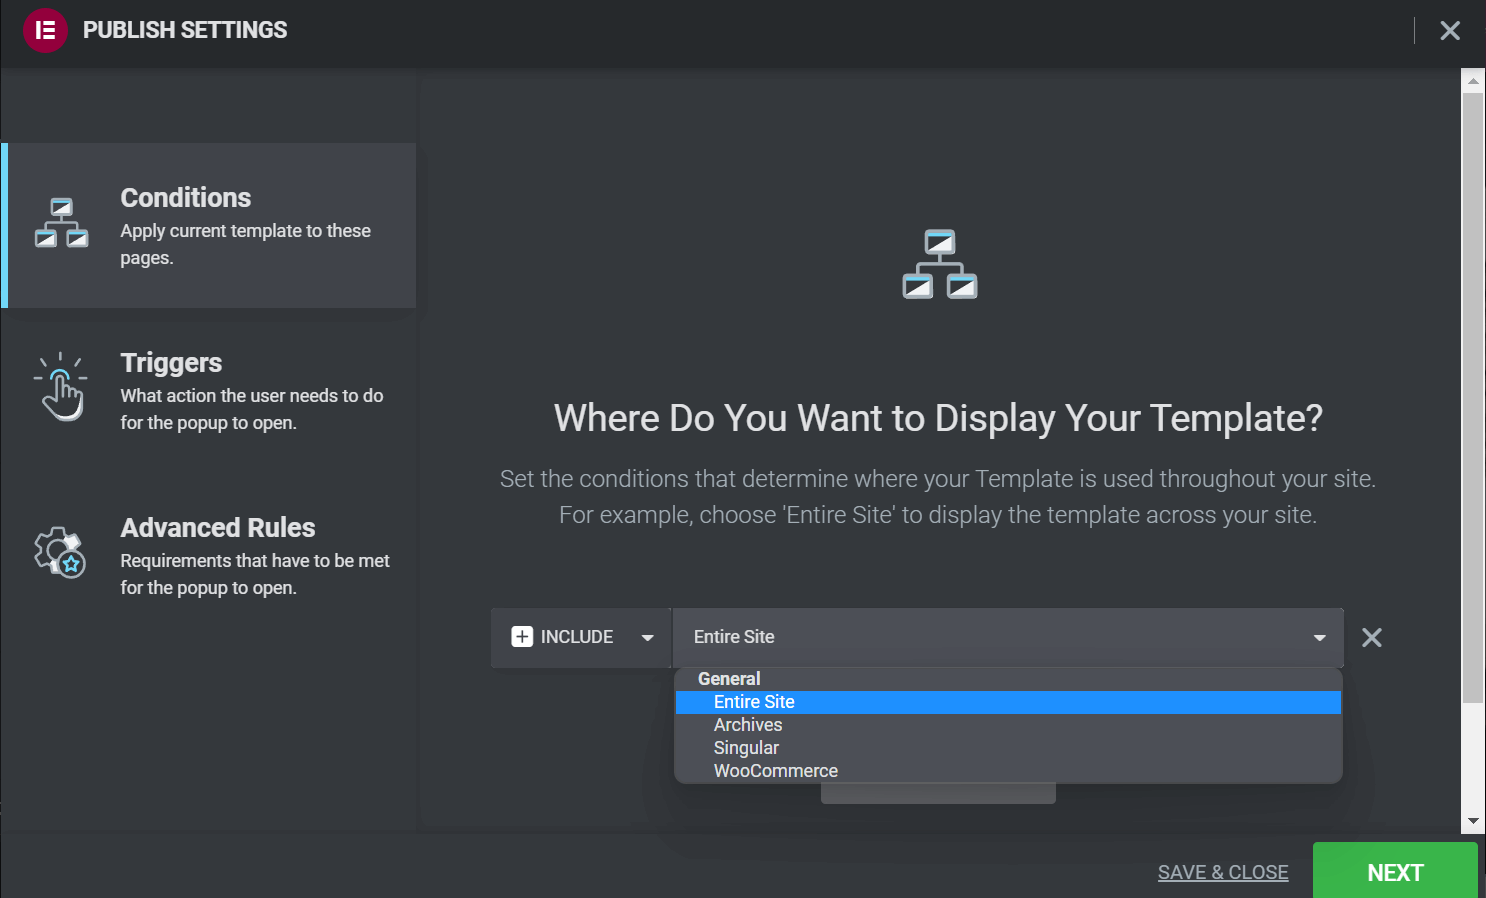
When you’re happy with your choice, hit NEXT. You’ll be taken to the Triggers for your popup form.
Step 3: Set Up Your Popup Triggers
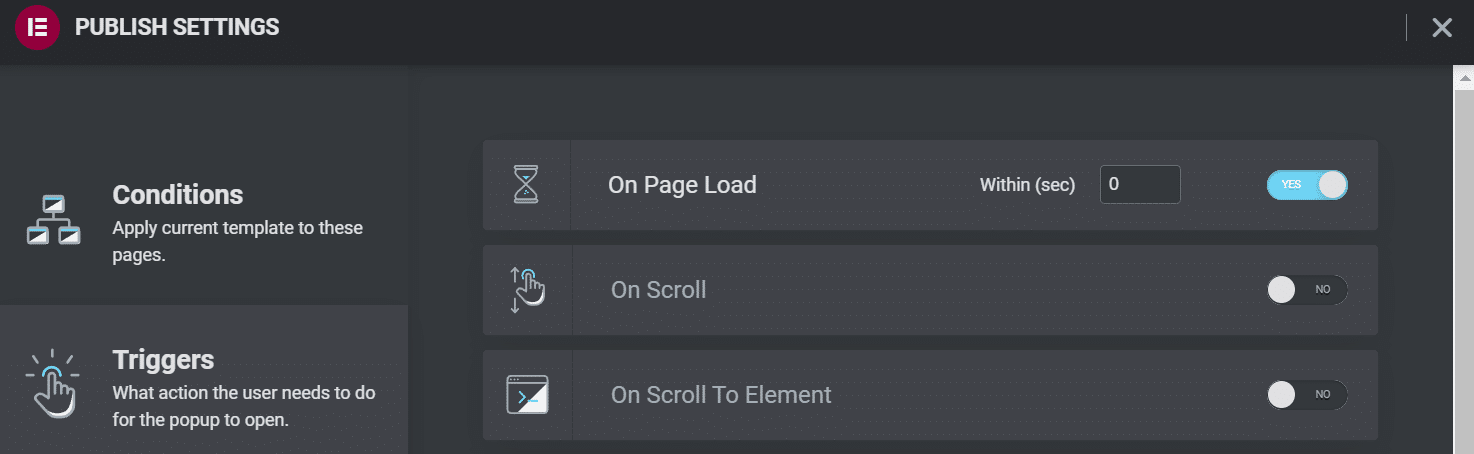
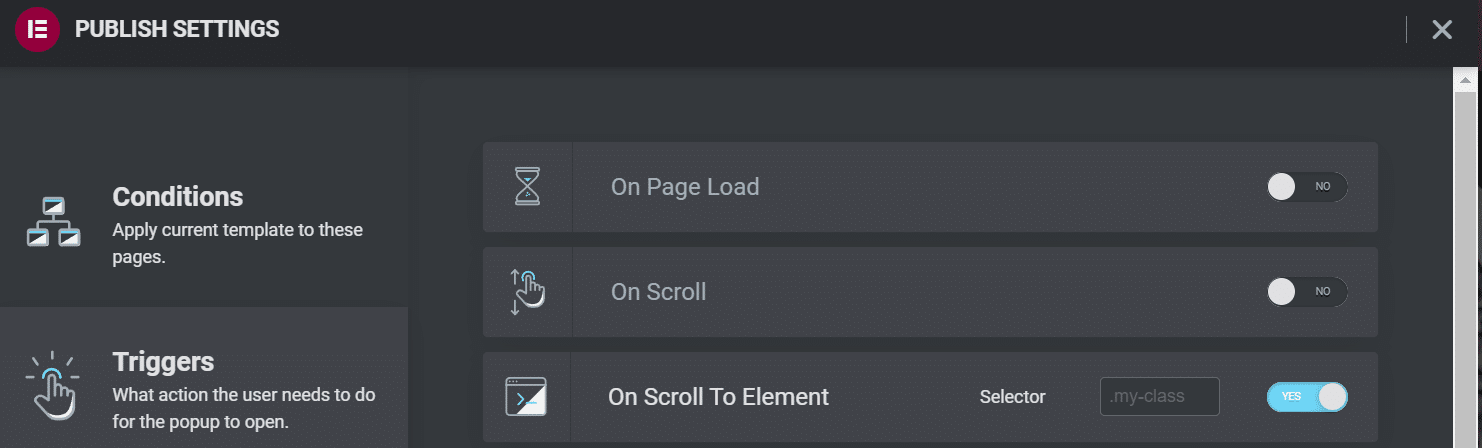
On the Triggers page, you can decide what users need to do to view your Elementor popup. By default, each option is disabled, and you can enable it by clicking on the slider. Then, you’ll need to specify values for your trigger.
For example, if you opt for On Page Load, you’ll need to choose within how many seconds your popup will display:
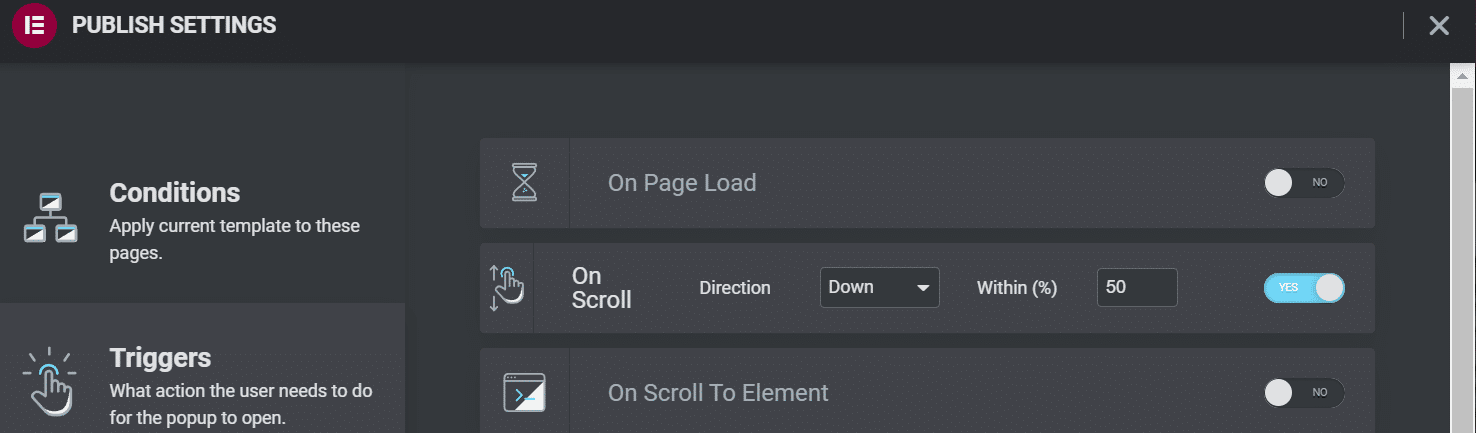
With On Scroll, you can choose which direction the user needs to scroll and how much of the page they must cover before the popup appears:
The On Scroll To Element setting requires you to enter a CSS ID. When a user reaches that element on your page, the popup will appear:
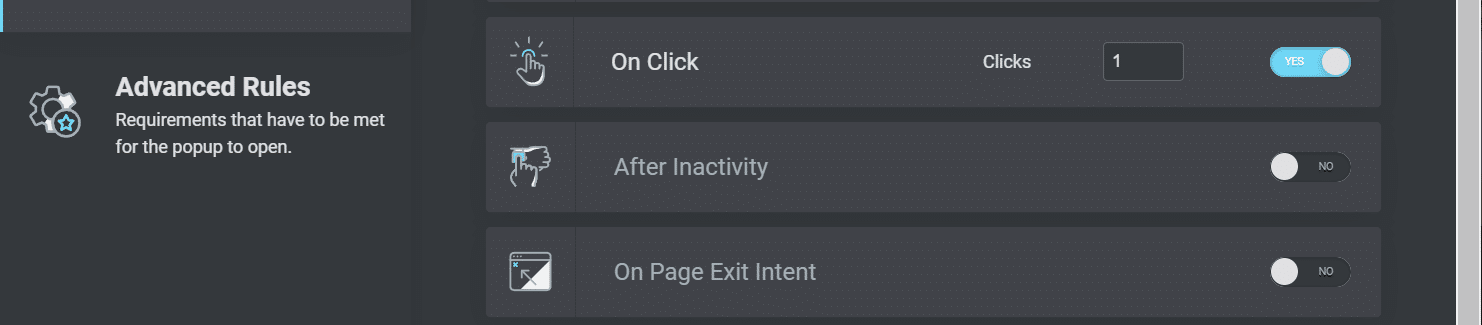
With On Click, you’ll have to specify how many times a user must click on your website before the popup displays:
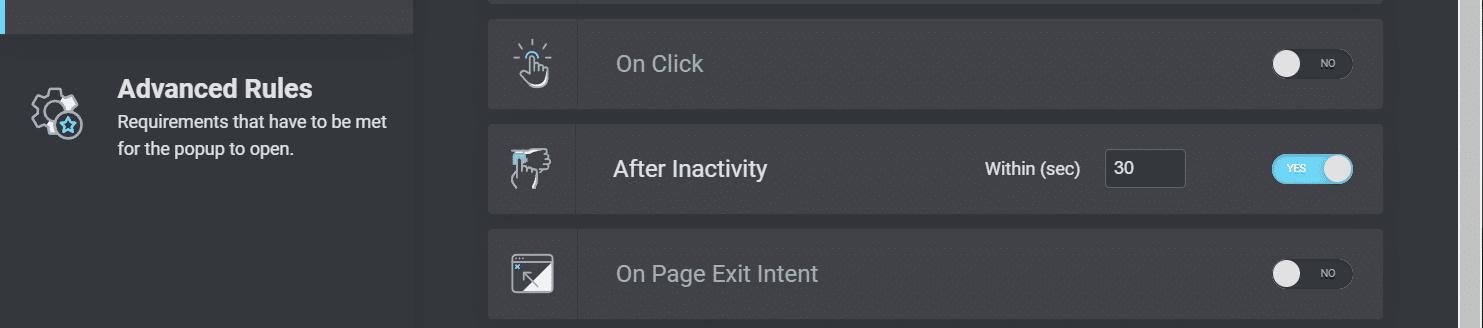
The After Inactivity setting enables you to trigger your popup after the user has been idle on your page for a particular amount of time:
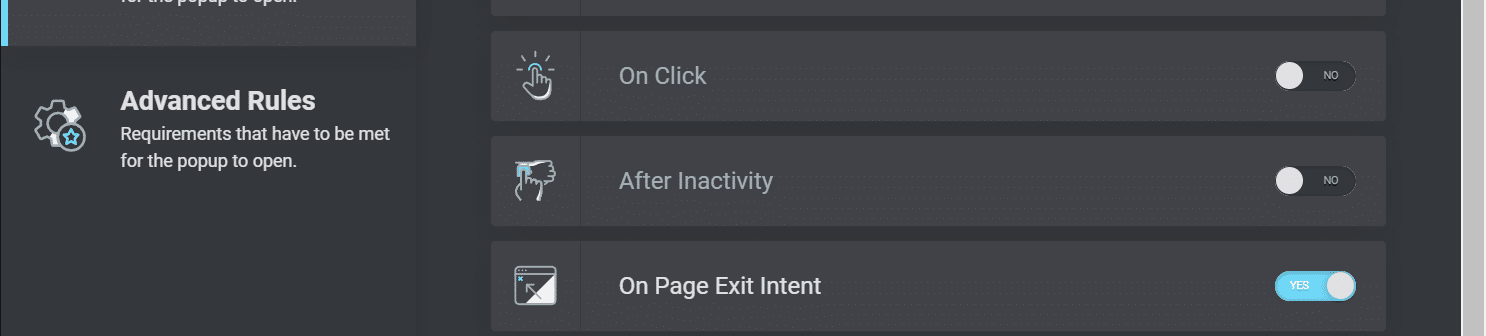
Finally, you can opt to enable On Page Exit Intent. This setting will trigger your popup when a user tries to leave your page:
Click on SAVE & CLOSE or NEXT to navigate to the Advanced Rules when you’re done. We will look at these rules a little bit later in this tutorial.
Step 4: Add a Popup Button to Your Site (Optional)
You might want to trigger your Elementor popup when a user clicks on a specific element on your page. For example, you could design a button that says “Sign Up Now” and embed it in your footer. When a user clicks the button, they’ll see your email registration form on their screen.
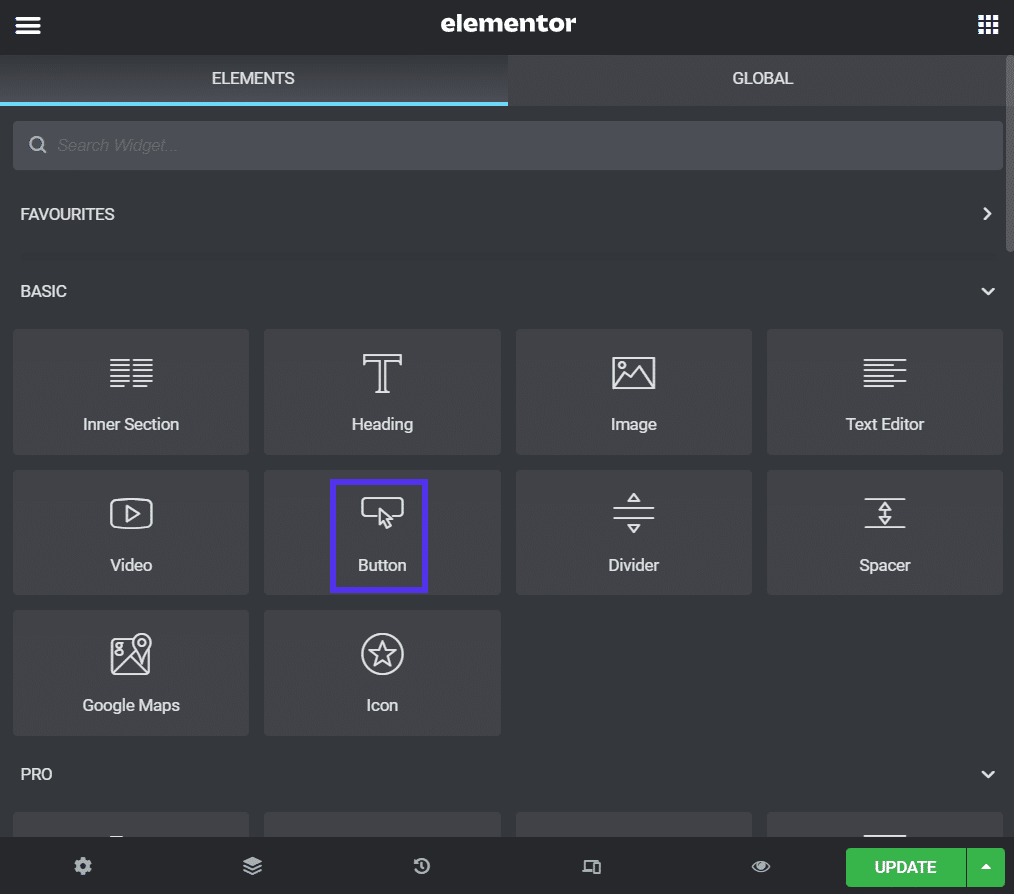
First, you’ll need to create an Elementor button on your website. Open the post or page in the Elementor editor and choose Button from the menu. Drag and drop it onto your page:
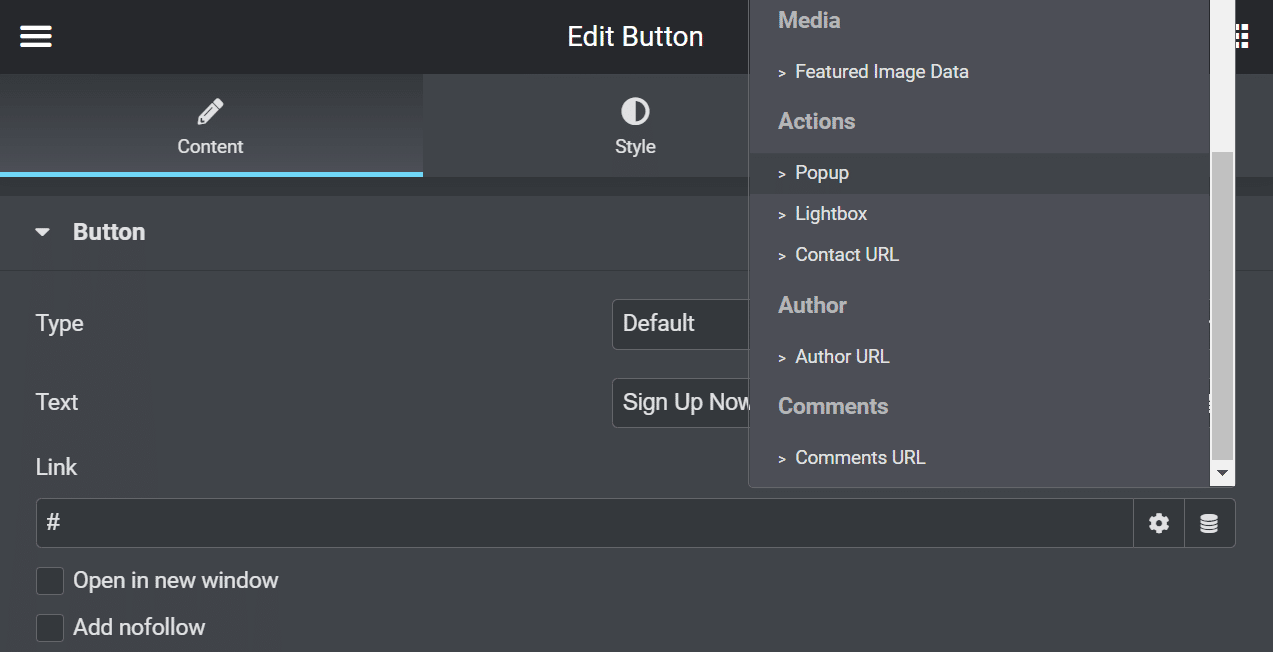
Once you’ve specified the button text and customized its appearance, click on Link > Dynamic Tags. Then, choose Actions > Popup from the dropdown menu:
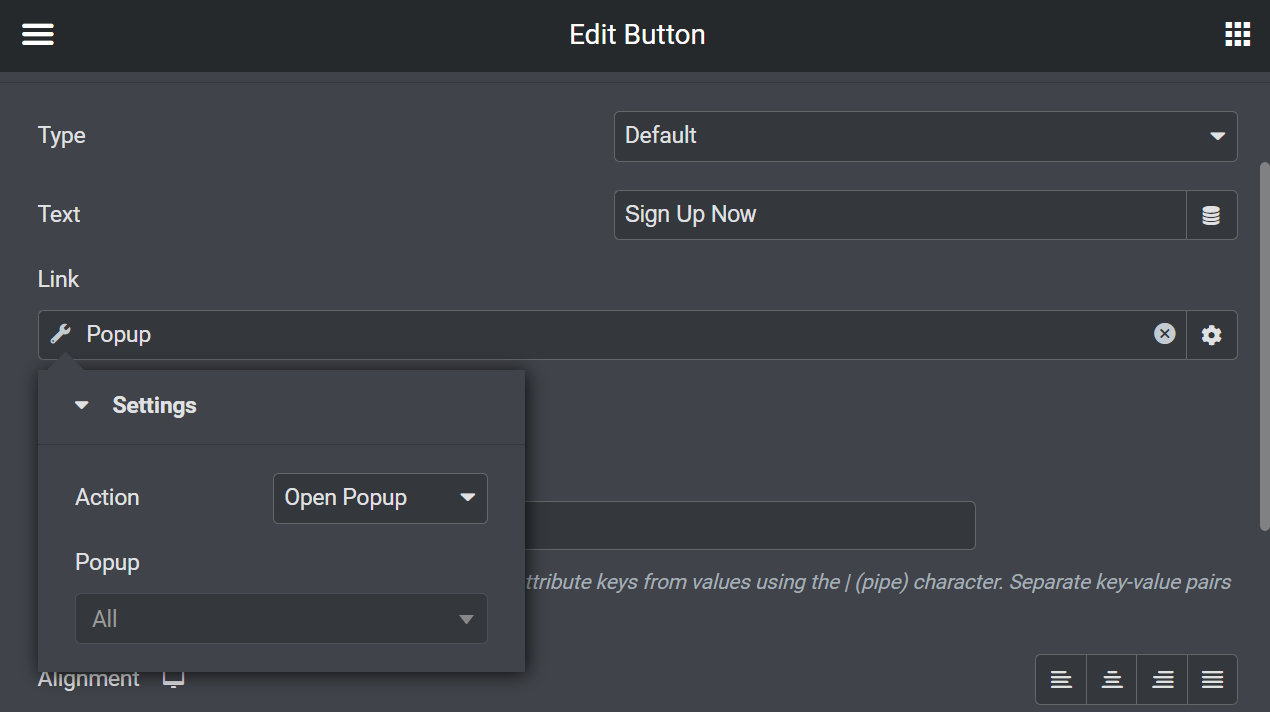
Click on Popup and choose Open Popup from the Action dropdown. You can also select your form from the Popup menu:
Finally, select UPDATE to publish your button. Whenever a user clicks on it, they’ll be taken to your signup form.
Step 5: Save Your Popup Templates for Later
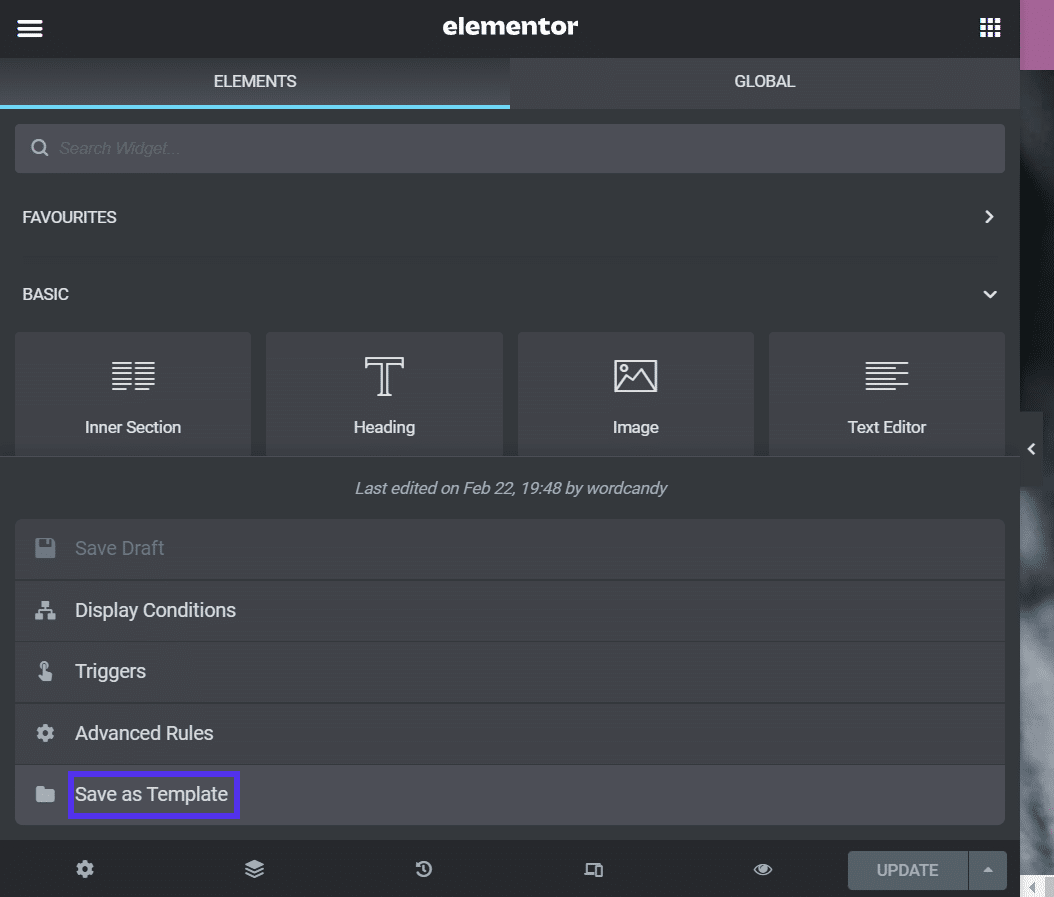
You can also save your popups as templates. Open your popup with the Elementor editor and click on the upward arrow next to UPDATE. Choose Save as Template from the menu:
You’ll then be prompted to name your template. When you’re done, click on SAVE:
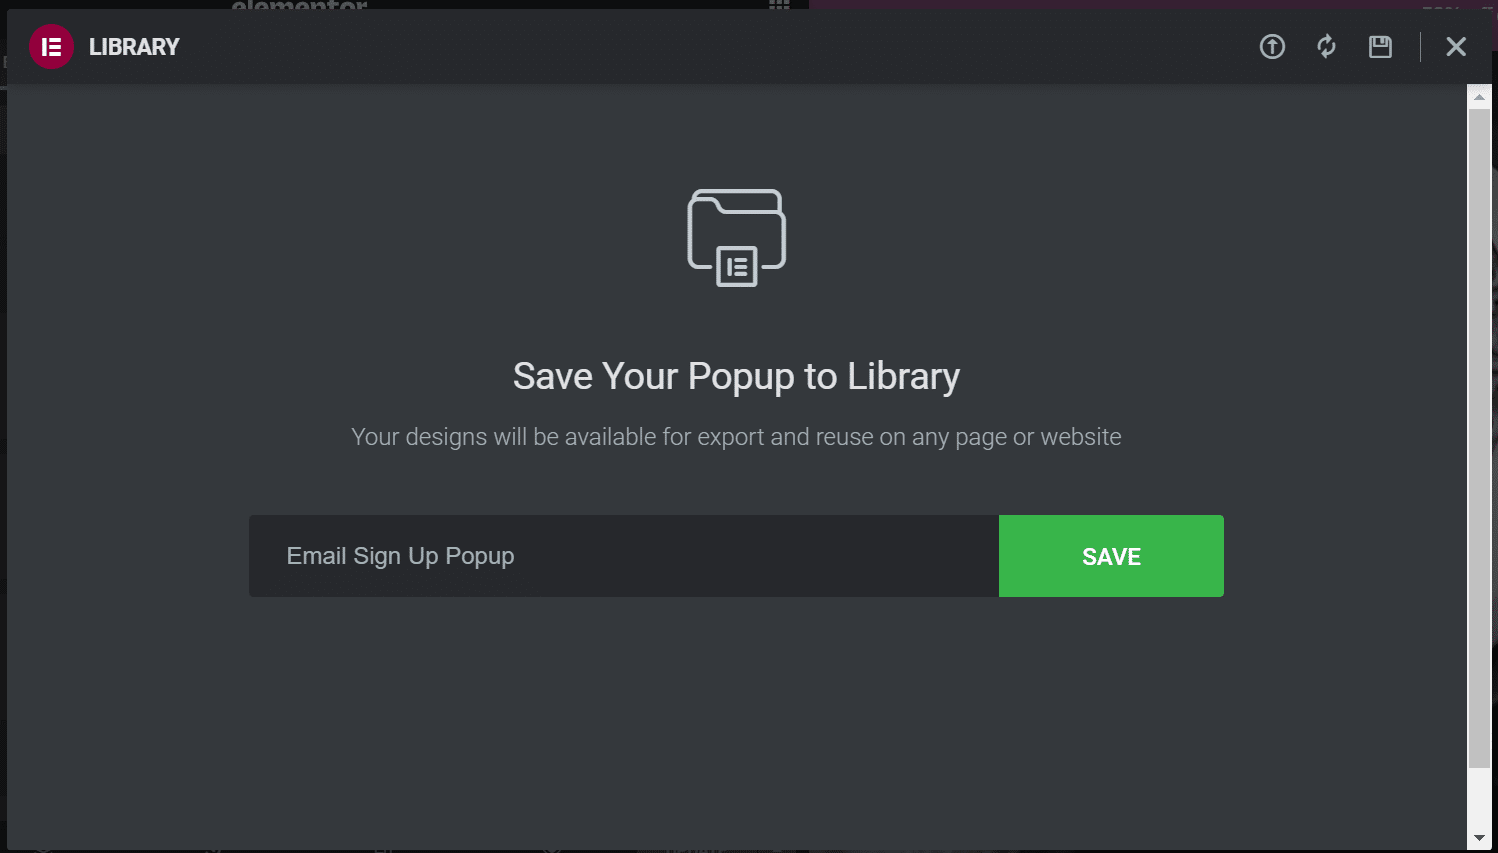
The popup will be saved to your Template Library. You can now use it when building a page or post with templates.
How To Configure Advanced Elementor Popup Settings
We already covered how to make a basic Elementor popup. However, there are also some advanced settings that you might want to use.
Open your popup again with the Elementor editor and navigate to Display Rules. Let’s take a look at the different settings.
Popup Display Settings
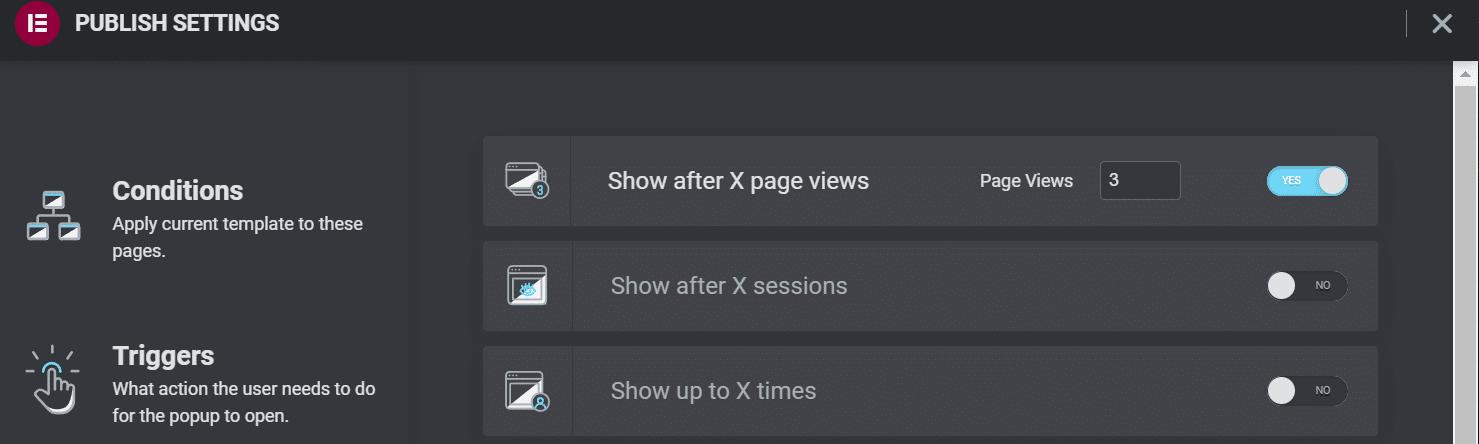
Some advanced popup display settings enable you to control when users see your form. These configurations could be handy to target return visitors rather than first-time ones.
For instance, you can choose to display your popup after your visitor has viewed your page a certain number of times:
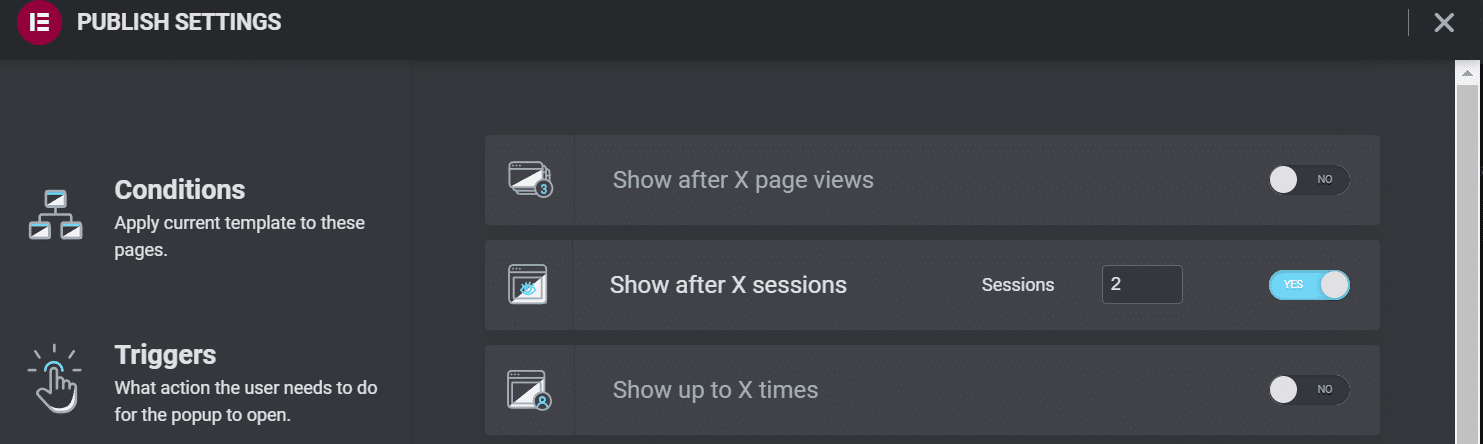
Alternatively, you might choose Show after X sessions. This setting targets overall visits rather than specific pages:
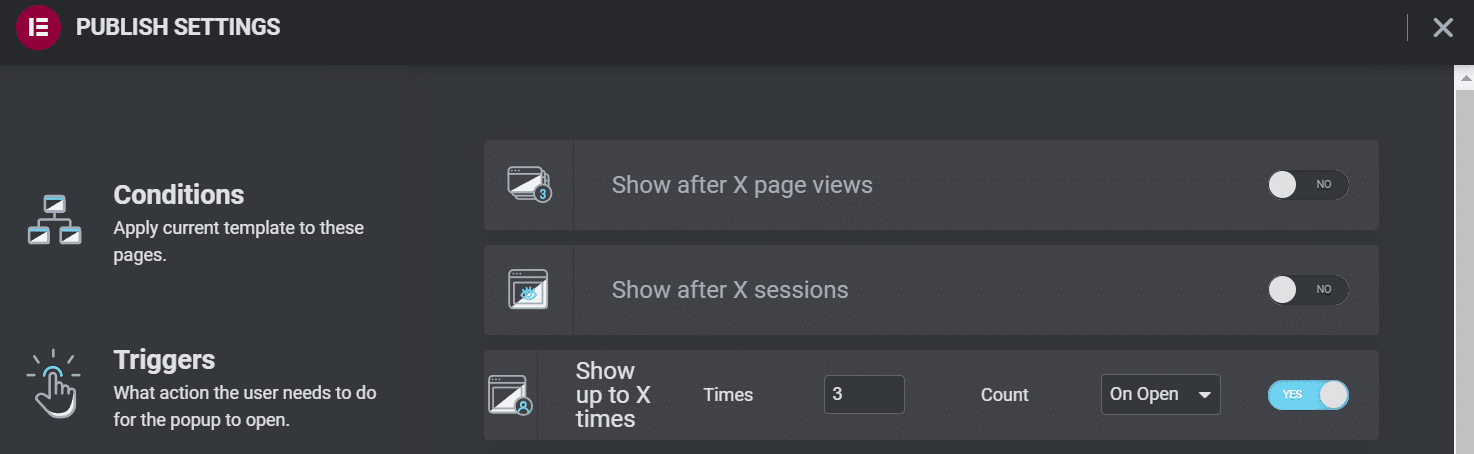
The Show up to X times setting can limit how many times users will see your popup. You might consider enabling it if you don’t want to spam visitors with intrusive forms continually:
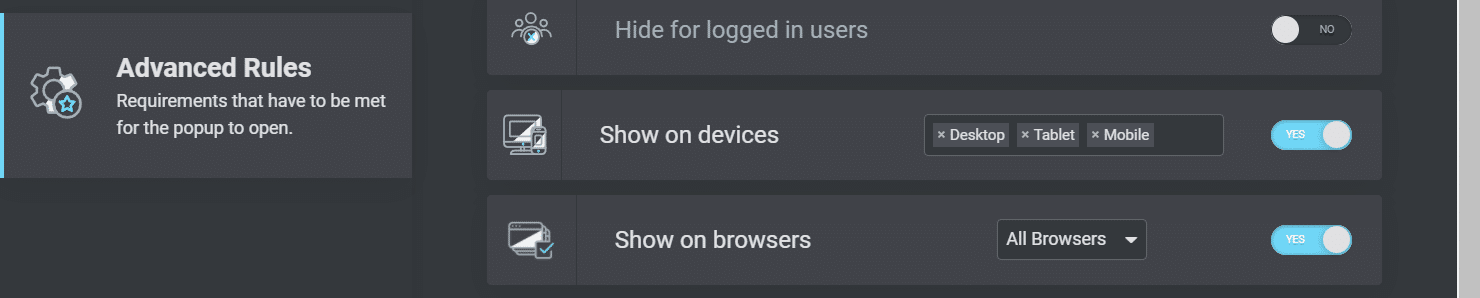
You can also use the Show on devices and Show on browsers settings to limit where your popup will appear. Popups can be particularly intrusive on mobile devices, so you might consider disabling them there:
Providing a better mobile user experience can keep your visitors happy. It can also boost your Search Engine Optimization (SEO) efforts and help your website rank higher in the search results.
User Origin Settings
Finally, Elementor enables you to configure popup display settings depending on where your users come from. These settings could be handy if you direct visitors to a promotional landing page and then use your popup for advertising deals or asking for contact details.
The following settings enable you to specify URLs and choose which links will trigger the popups:

Finally, you can choose to hide your popups from logged-in users. You might use this setting if you run a paid membership website:

When you’re happy with all of your chosen settings, click on SAVE & CLOSE. You can navigate back here and change any of these configurations if needed.
Top 3 Plugins for Elementor Popups
As we have seen, Elementor Pro makes it easy to create popups for your website. However, you might not be ready to upgrade to the premium page builder. Alternatively, you may be looking for additional design features.
Here are a few of the best plugins for Elementor popups with those considerations in mind.
1. JetPopUp (Crocoblock)

JetPopUp is a user-friendly plugin with a drag-and-drop interface that integrates perfectly with Elementor. It enables you to create dynamic and customized popup forms, including email signups, cookie consent forms, and countdowns.
JetPopUp shines with its interactive features. You can choose from multiple animation settings, such as sliding, flipping, and rotating. Moreover, the plugin has various templates that you can customize to your needs.
This plugin also lets you select and customize multiple display settings. For example, you can show your JetPopUp forms to users on particular dates when they try to leave your website, or after a certain amount of scrolling.
Features:
- Choose from preset popup templates
- Select different popup display conditions
- Include and exclude specific conditions
- Use animation effects
Pricing: JetPopUp costs $22 per year. This package includes MailChimp integration, a popup widget, and customer support. You can also upgrade to an all-inclusive subscription for $130 per year. It comes with 20 additional plugins and 150 extra widgets.
2. Popup Box Widget (PowerPack)
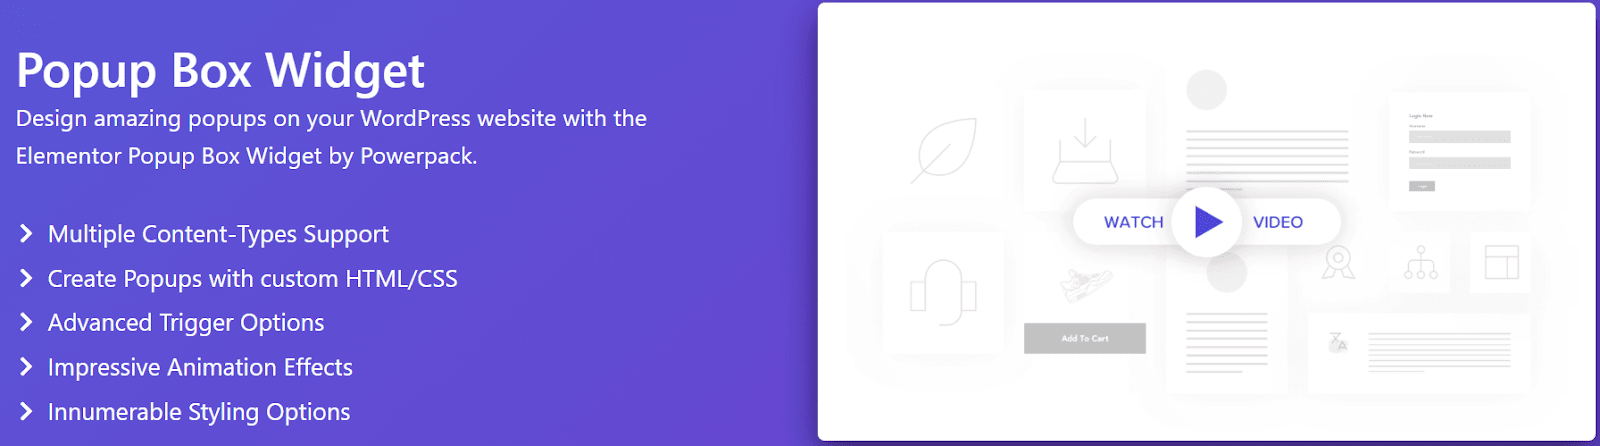
If you’re looking for advanced Elementor popup settings, consider using Popup Box Widget by PowerPack. It lets you build custom popups that include dynamic elements such as videos, images, and Google maps.
This plugin enables you to trigger popups according to various user actions, including exit intent and custom time delays. You can also create interactive two-step popups with links and other elements of Call to Action (CTA).
Furthermore, Popup Box Widget has advanced animation settings. You can make your popups zoom, use newspaper formatting, or use 3D animations.
Features:
- Choose from animation effects
- Create two-step popups
- Use time delays and user triggers
- Display images, videos, and other interactive elements
Pricing: Popup Box Widget is included with a PowerPack subscription. Plans start at $49 per year and come with more than 70 different Elementor widgets.
3. Lightbox & Modal (Essential Addons for Elementor)
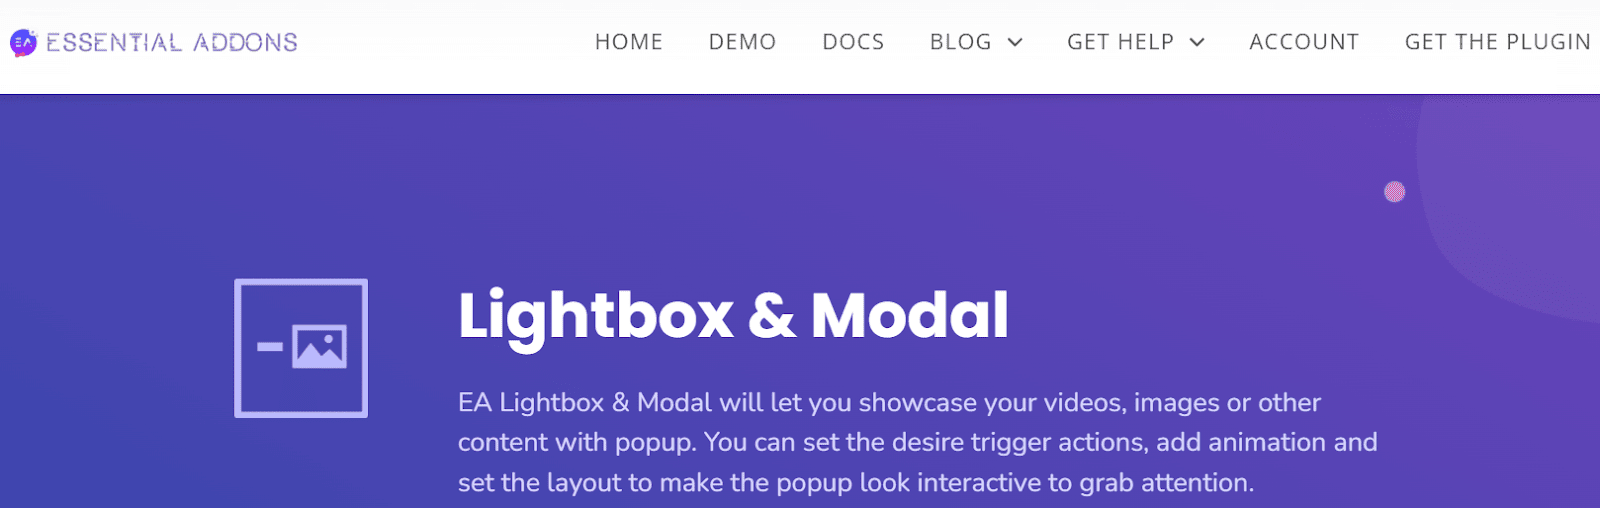
We briefly touched on this Elementor popup plugin earlier. Lightbox & Modal is a versatile widget with the Essential Addons for Elementor tool. It helps you create popups with interactive features like videos, images, and animations.
Lightbox & Modal is designed to work with buttons and links on your Elementor website. You can create custom buttons, icons, and text that trigger your popup forms. Furthermore, the widget can use time delays and other user actions.
Overall, Lightbox & Modal could be the best option to interact with your users rather than simply present information.
Features:
- Use button triggers for popups
- Display images, videos, and custom content
- Customize popup layouts
- Choose from different animation types
Pricing: Lightbox & Modal is included with Essential Addons for Elementor Pro. Plans start at $39.97 per year and have more than 70 widgets and seven extensions.
Summary
Popup forms can be essential to your lead generation and marketing campaigns. They can also help you interact with visitors and keep them on your page. Fortunately, you can create custom popups with the Elementor page builder.
It’s super easy to create popups with Elementor Pro. You can customize them to match your branding and decide where they display on your site. You can also set advanced display settings to show your popup based on user actions and origins.
Designing a beautiful website with Elementor is just the first step. You’ll also need a WordPress hosting provider in your corner. Check out our pricing plans today to see how Kinsta can supercharge your site!
Save time, costs and maximize site performance with:
- Instant help from WordPress hosting experts, 24/7.
- Cloudflare Enterprise integration.
- Global audience reach with 34 data centers worldwide.
- Optimization with our built-in Application Performance Monitoring.
All of that and much more, in one plan with no long-term contracts, assisted migrations, and a 30-day-money-back-guarantee. Check out our plans or talk to sales to find the plan that’s right for you.