
When you first launch a WooCommerce store, you’re likely focusing on the basics like adding new products, setting up your shopping cart, and streamlining the checkout process. However, setting up a WooCommerce variable product may be a bit of a mystery to you.
Or, at the very least, it’s not something that’s a top priority. But when you come across a product with numerous variations, it suddenly becomes quite a pressing matter.
Thankfully, adding product variations in WooCommerce is simple and doesn’t require a lot of technical know-how. But if you’re new to the ecommerce platform, it’s normal to be a bit disoriented navigating your options.
We aim to help with that today. We’ll be covering what variable products are, the differences between variables and attributes, how to create a WooCommerce variable product, and how to optimize your product variations better using plugins.
Let’s get started.
What Is a WooCommerce Variable Product?
A WooCommerce variable product can be easily defined as a product available in several different types, styles, or variations. Examples of variations include things like:
- Color
- Size
- Style
- Materials
This is not quite the same as a product filter in WooCommerce. Even when you filter products, you still need to select variables.
When a customer visits a product page with variables, they will need to make a selection of some sort before adding the item to their cart. Many types of stores and businesses make use of variable products. Here are a few popular examples:
- A clothing store that offers items in various sizes and color options.
- A pizzeria that allows customers to select toppings from a dropdown or checkbox-style menu before adding the item to the cart.
- An artist who sells custom prints on various materials like canvas or wood, in multiple size options.
- A home goods seller needs customers to select the materials and/or fabrics for furniture items.
And the list goes on. Virtually every type of store will require product variations at some point.
The good news is that WooCommerce can create variable products built-in. And it’s not that difficult to configure. But before we jump into the step-by-step tutorial on how to do so, we need to first make an essential distinction between variations and attributes.
Attributes vs Variations
The most significant distinction between variations and attributes within WooCommerce is that variations can be interacted with by the customer while attributes cannot.
First of all, attributes are what define variations. These are the different stylings such as color, pattern, etc. You can also sort by these attributes within WooCommerce. But they are simply informational and don’t come with any functionality.
Attributes are also used to define the features of a specific product. A product page for a purse may list the dimensions, the fabric used, and the handle’s material as attributes. These are stated facts about the product – its attributes – and the customer can’t make selections based on these attributes.
On the other hand, variations put the attributes to use through variable products and allow users to purchase items of a certain attribute. Variations also cover different combinations of these attributes, which can create separate product options.
For example, suppose you have color and logo attributes for a product. In that case, these can be combined into different variations, i.e. hat with a blue dolphin logo, a hat with a green logo of a salamander, and so forth.
The point here is that a customer can select variations before checkout as part of the conversion process while attributes cannot.
However, it would help if you had attributes established before setting up any variations. But before you run for the hills out of sheer confusion, not to worry: the process is pretty straightforward.
How To Create a WooCommerce Variable Product
Now we’ve come to the tutorial portion of the article. Before we begin, we will assume you already have WooCommerce installed and have a few products added to your store already.
1. Create Product Attributes
Your first order of business here is to create some product attributes. You can go to Products > Attributes in the WordPress dashboard.
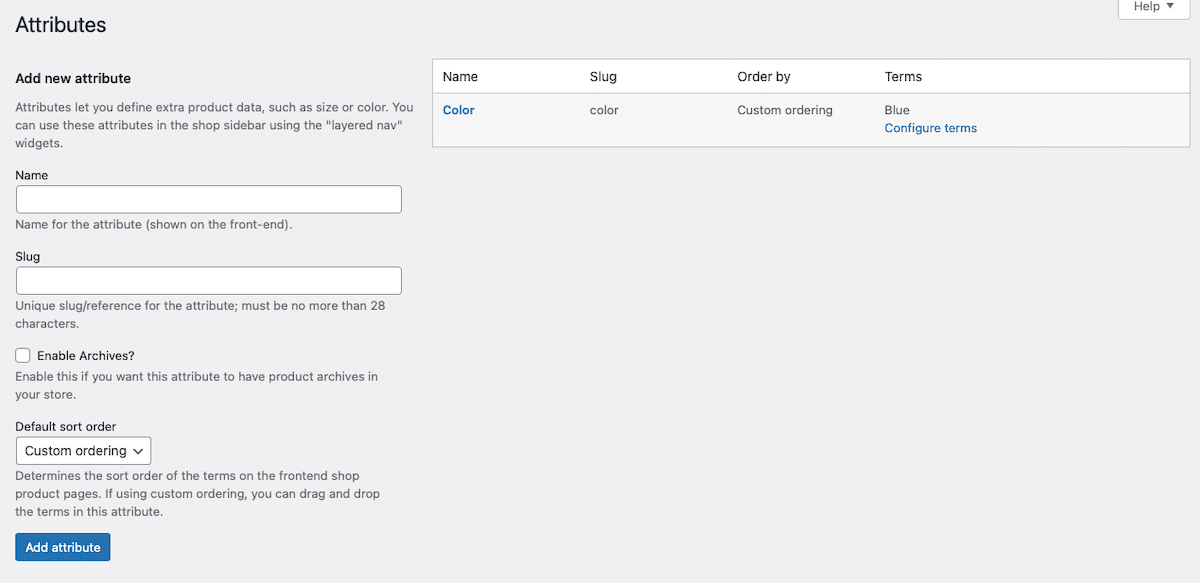
In this section, you can create a new attribute for your online store. When it’s first installed, a default attribute of “Color” is added to WooCommerce.
We’ve added an additional attribute here of “Size.” Simply type in the name of the Attribute (Size), an associated slug (size), and then click the blue Add attribute button when you’re all finished.
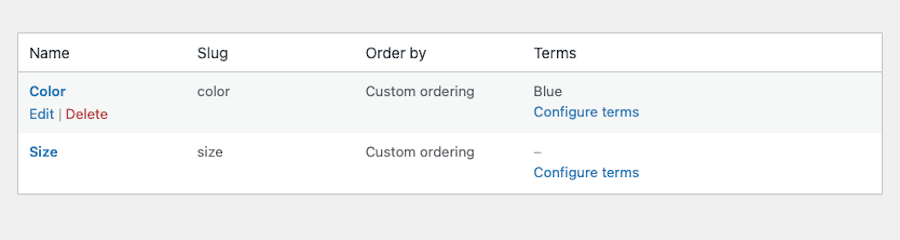
From there, you can click on the link that reads Configure terms next to the Attribute you’ve just created.

In this section, you can add as many terms to associate with your new Attribute. For “Size,” we’ve added the term “Medium” here. This follows the same process as when adding attributes. Simply type in the name (for our example, we used “Medium”), a slug (medium), and a description if you’d like. When you’re done making changes, press the blue Add new Size button.
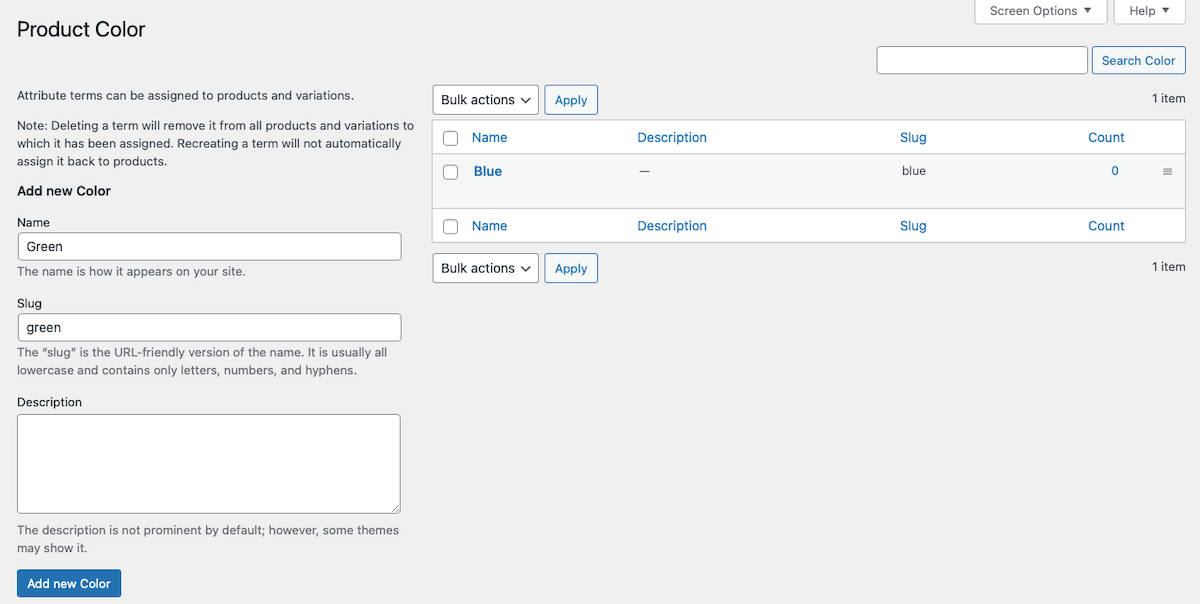
We’ve added additional terms for the “Color,” Attribute as well. You can see “Green,” shown above.
You can add as many Attributes and associated terms for each that you’d like in WooCommerce in this fashion. Which attributes and terms as well as how many of each you add will be dependent on the type of store you run and the types of products you sell.
2. Create a Variable WooCommerce Product
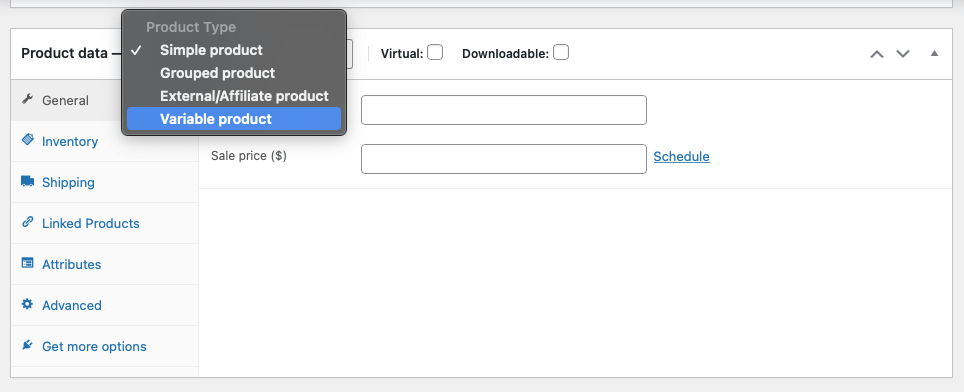
The next order of business is to create a product page where your attributes can be applied. To do this, you need to go to Products > Add New.
Give your product a name and description, add any images you’d like, and otherwise edit it however you see fit. Then, scroll down to the Product data section.
At the top, click the dropdown menu and select Variable product.
Next, you can fill in all the relevant details under the General tab such as pricing.
3. Assign Attributes
With your product set to be a variable product, you can now add the attributes you created earlier to it. Click on the Attributes tab and select one of the attributes you made. Then click the Add button.
A section called Value(s) will appear, under which you’ll see all the terms you assigned to this attribute earlier. Select whichever terms apply to this particular product (or click Select All if that applies and is easier).
Ensure you have the checkbox next to “Visible on the product page,” checked if you want these attributes to be available for your customers to select.
And if you wish to create variations out of these attributes, check the box next to “Used for variations,” as well.

Finish up this section by clicking Save attributes.
4. Add Variations
Your last order of business here is to add the variations themselves to your product page. Click the Variations tab.
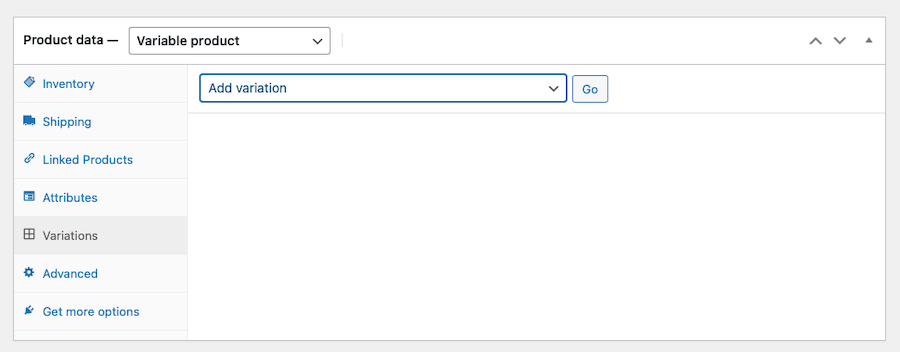
In this section, you should see a dropdown that says Add variation. Click the button next to it that says Go.
A new dropdown menu will then appear when you can select the attributes that apply to this particular product. Select as many as apply to the product.
Under each variation, you can adjust settings as well, like setting prices for each variation, a sale price, SKU number, stock status, weight, and dimensions. Only the price is required, however.
When you’re all done making changes to your variation, click the blue Save changes button.
You can then repeat the process for any other variations you’d like to create.
Optimizing WooCommerce Product Variations
Now that you know what variable products are and how to create them in WooCommerce, you can dive a bit deeper into how to make them really shine. Here are several WooCommerce plugin and extension options that can bring out the best in your product pages and boost conversions.
1. Swatches
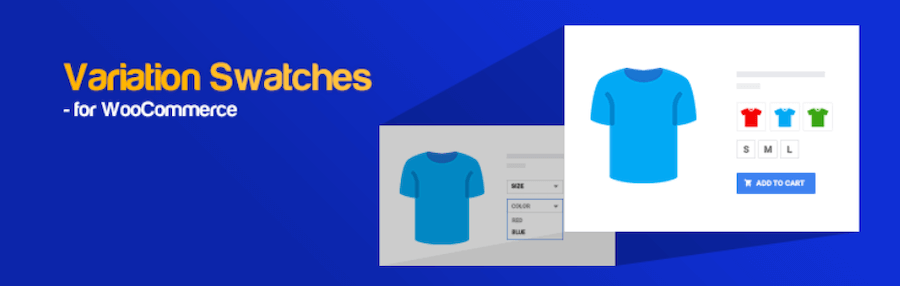
The first plugin we’ll discuss here is Variation Swatches for WooCommerce. It offers a streamlined and aesthetically pleasing way to display product attributes and variations. This plugin also provides greater options for how customers can select these options, in the form of color block swatches, labels, and radio images. It’s an all-around stylish way to display product variations and eliminates the dropdown menu altogether.
These options work in product quick view as well as on product pages. You can even select the shape of the swatches – rounded or circles. Other features include tooltips on hover and custom CSS capabilities.
Variation Swatches for WooCommerce is free.
2. Additional Variation Images
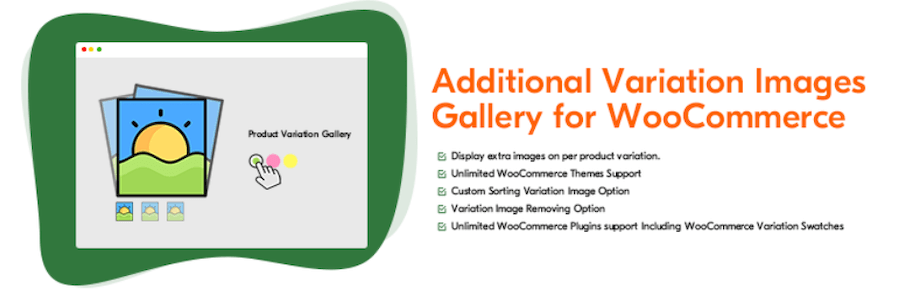
Next, we have the Additional Variation Images Gallery for WooCommerce, which makes it possible to display more than one image for product variations. By default, WooCommerce lets you display one image per product variation, but this plugin extends that and allows you to display a gallery for each variation.
Giving customers more views of your product can boost sales, after all. So, when a customer switches between different product variations on a product page, they will be shown a different set of images. More information = better understanding of what you’re selling. And that can spell greater trust in your brand.
The Additional Variation Images Gallery for WooCommerce plugin is free.
3. Product Attribute Filter
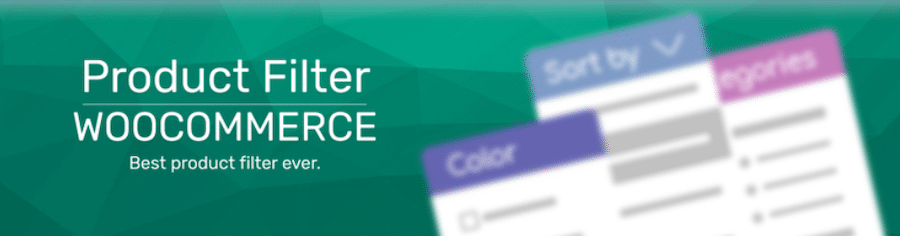
Product Filter by WooBeWoo is another great plugin option well worth a look. This one makes it so visitors to your online store can sort your products by a wider variety of factors, including category, tags, taxonomy, price, and attributes.
The primary features included here are filtering by any criteria like on sale status, rating, or whether or not the item is in stock. It also allows you to display filters on the front-end of your website using multiple options, including a dropdown menu, checkbox list, radio button list, and icons. It also supports AJAX live search and works with Elementor.
Product Filter by WooBeWoo is free.
4. Customize Product Feed

Another plugin to check out is Product Feed PRO, which makes it possible to create product feeds for marketing purposes. With it, you can create an unlimited number of products and feeds using over 100 different templates for various online marketing places. It includes support for Google Shopping, Facebook Remarketing, Pricerunner, Bing Ads, Skroutz, etc.
Other features include field mapping, category mapping, filtering, and support for product variables. You can also use this plugin to add a Facebook Pixel to your site, a Google Dynamic Remarketing pixel, and Facebook Conversion API.
Product Feed PRO is free.
5. Add More Product Options

If you need to display even more options on each product, Extra Product Options for WooCommerce is a great choice. It allows you to add custom product fields to your product pages with ease. Instead of creating custom layouts yourself or working within the standard product page editor, this plugin adds advanced fields to the product page, letting you create pages that truly cater to your customer’s needs.
This plugin comes with 17 different custom fields to use, including text, password, hidden, email, number, URL, telephone, text area, select, radio buttons, checkbox, checkbox group slider, date picker, color picker, heading, and paragraph.
The Extra Product Options for WooCommerce plugin is free. There is a premium option available as well that adds on 7 more product options, including time picker, HTML, color palette, file upload, multi-select, data and time range picker, and image group. The premium version costs $39 for a single site license.
6. Add Dynamic Pricing for Variations

The Advanced Dynamic Pricing plugin has a place for many sellers, too. It works by adding dynamic pricing or discount features to your WooCommerce shop with the ability to turn on and off these rules whenever you wish.
With it, you can set dollar amounts, percentages, and fixed products for individual products or groups of products. Other features include bulk pricing and role-based prices. So, you can set a discount for products across an entire category, and set up special deals where if a customer purchases a certain number of items they get a percentage discount or establish BOGO deals.
The options are pretty flexible and allow you to get creative with your pricing and sales. Advanced Dynamic Pricing for WooCommerce is free, but there is a premium version available with additional rules and features. Premium pricing starts at $50 per year.
7. Display Variations in a Table
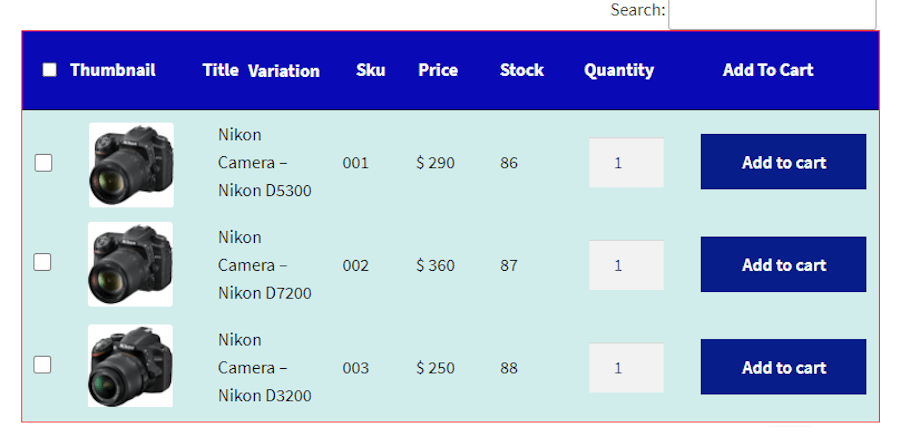
The Product Variations Table for WooCommerce extension is another solid tool to have on hand, especially if you sell products with a love of complex and concurrent variations. Customers can make use of this plugin by filtering and sorting through variations on each product page.
It works by allowing you to display product variations in the form of a table that customers can interact with via sorting and Ajax filtering features. Customers can even search for products by variation within this table format. And it includes Add to cart buttons next to each item in the table, improving the chances of conversion. Customers can even export variation info into downloaded files in PDF, Excel, or CSV format.
All tables you create can be customized to match your store’s branding and includes a shortcode for easy application. The Product Variations Table for WooCommerce extension costs $49 per year.
8. YITH WooCommerce Color and Label Variations

Lastly, there’s YITH WooCommerce Color and Label Variations, which offers an easy way to display product options on your product pages. And it does so in an attractive way that’s designed to convert more effectively.
The idea here is to put all your product options at your customer’s fingertips to know exactly which options they have and what’s available to them. Each product variation can be displayed by means of icons or custom images of your choosing.
YITH WooCommerce Color and Label Variations is a premium offering and is priced at $89.99 per year.
Summary
And there you have it. Creating variable products in WooCommerce isn’t all that daunting now, is it? Once you have a clear understanding of what variables are and how they work, you can create them with relative ease.
Today, we’ve discussed what variable products are and how they work. We’ve talked about the differences between variations and attributes, and how you can create a variable product and its associated attributes.
We’ve compiled several plugins that enhance variable product features in terms of form and function. There’s something for everyone here. Hopefully, you can now create variable products and make them work for your online store.
And if you need more tips on boosting WooCommerce sales, we have a complete guide for that.
Save time, costs and maximize site performance with:
- Instant help from WordPress hosting experts, 24/7.
- Cloudflare Enterprise integration.
- Global audience reach with 34 data centers worldwide.
- Optimization with our built-in Application Performance Monitoring.
All of that and much more, in one plan with no long-term contracts, assisted migrations, and a 30-day-money-back-guarantee. Check out our plans or talk to sales to find the plan that’s right for you.